-

Del Mar College
CIS 306 - Managing NOVELL® Networks
Instructor: Michael P. HarrisIntranetWare 4.11 

 IntranetWare Installation Guide
Chapter 5 - Setting Up Online Documentation
Documentation for IntranetWareTM for Small Business is provided in online format. You can view or print the documentation from your Windows*, Macintosh*, UNIX*, or OS/2* workstation using the Netscape* Navigator included with this product. Online documentation has been optimized for Netscape Navigator. Other network browsers can be used; however, some degradation in quality may result.
The QuickFinder search engine helps you find the word, phrase, or section you need. A table of contents, that you can display or hide as you choose, is provided for each collection.
Several sets or collections are included.
- IntranetWare for Small Business Collection. This set contains an Installation Guide and an Administration Guide. The information in these manuals is specific to the Small Business version of IntranetWare and the NEAT utility designed for Small Business administrators. In most instances, you will find the information you need in this set. Cross references (links) to other documentation sets are included when advanced or detailed information might be helpful.
- NetWareŽ 4.11 Collection. This collection contains information specific to Novell's core product, IntranetWare. Advanced procedures using NetWare Administrator and instructions for using server, command line, and menu utilities are included.
- NetWare ConnectTM Collection. Several online manuals that explain how to install, configure, optimize, and administer NetWare Connect are included in this set. However, basic instructions can also be found in " Setting Up Modem and Internet Access with NetWare Connect" in the Administration Guide (Small Business online documentation).
This chapter provides information about installing, viewing, and printing the documentation.
Installing Online Documentation
Several options are available for installing or accessing Small Business online documentation. You can do any of the following:
- Install Small Business documentation from the list of Optional Products when you install the server. See "Installing the Server"
- Use INSTALL.NLM at some later date to copy the documentation to the server. Follow the procedure below.
- Mount the documentation CD-ROM at the server as a NetWare volume and access the documentation directly from the CD. This option can be used when disk space on the server is limited (online documentation takes about 48 MB per language). See "Using a CD-ROM as a NetWare Volume" in Supervising the Network (NetWare 4.11 online documentation).
NOTE: Users can also access the documentation CD-ROM directly from a Windows 3.x or Windows 95 workstation equipped with a CD-ROM drive. In this case, the documentation does not need to be installed on the server.
If you did not install the documentation when you installed the Small Business server, complete the following steps:
Procedure
Insert the IntranetWare for Small Business Documentation CD into the server's CD-ROM bay.
From the server console, type
LOAD INSTALL .
Select Product Options.
Select Choose an item or product listed above.
Select IntranetWare for Small Business Documentation.
Select the language.
You can install documentation for one, several, or all available languages. Each language requires about 48 MB.
When prompted for a path, press <F3> and type
D:\INSTALL
NOTE: If you are warned of a potential CD-ROM driver conflict, proceed with the install. If there is a conflict, the keyboard will lock. Reboot the server, mount the CD-ROM as a NetWare volume, and continue from Step 2, above.
To mount the documentation CD-ROM as a NetWare volume, type the following commands at the server console prompt:
LOAD CDROM
CD MOUNT IWSB_DOC
In addition, you may need to load a driver for any SCSII adapter added to or not detected by your system. For complete information, see "Using a CD-ROM as a NetWare Volume" in Supervising the Network (NetWare 4.11 online documentation).
Follow the screen prompts to complete the install.
Files are placed in the SYS:PUBLIC\DOC\language directory.
Installing Netscape 3.0
Once the administrator has set up the network and installed client software on your workstation, you can access applications to which you have rights through NetWare Application Launcher (NALTM ).
IMPORTANT: NAL is only available on client workstations running either Windows* 3.1x or Windows 95*.
The following applications appear in NAL:
- NetWare Easy Administration Tool (NEAT)
- Netscape 3.0 Install
The Netscape 3.0 Install application is installed on the server during the server installation. You install Netscape 3.0 to your workstation from the network using NAL.
IMPORTANT: If you currently have an existing copy of Netscape on your workstation, you should run this install to modify your Bookmark file to include the IntranetWare for Small Business Documentation bookmark and QuickFinder which enables you to search the online documentation.
To install Netscape 3.0 to your workstation, complete the following steps:
Installing Netscape 3.0 from Windows 3.1x
Procedure
Double-click the NAL icon.
If you installed the client from CD-ROM, the NAL icon is located in the StartUp group in Program Manager; if you installed from diskettes, it is located in the group that you created during installation. If you are unable to locate the NAL icon, see "Create the NAL Icon in Windows 3.1x."
Double-click the Netscape Install icon.
Your operating system and language is detected automatically to ensure that you install the correct version of Netscape 3.0.
Follow the prompts to install Netscape to your workstation.
Click No when prompted to continue setup at the Netscape Internet site.
Netscape 3.0 is installed to your workstation in the directory that you choose, and a new program group is created in Program Manager.
Installing Netscape 3.0 from Windows 95
Procedure
Select NetWare Application Launcher from the Start menu.
If you are unable to locate NAL, see "Create a NAL Icon in Windows 95."
Double-click the Netscape Install icon in NAL.
Your operating system and language is detected automatically to ensure that you install the correct version of Netscape 3.0.
Follow the prompts to install Netscape to your workstation.
Click No when prompted to continue setup at the Netscape Internet site.
Netscape 3.0 is installed to your workstation in the directory that you choose, and a shortcut is created on the Desktop.
Accessing Online Documentation
Online documentation can be accessed directly from the IntranetWare for Small Business Documentation CD-ROM or, if you have installed it to the server, from the server.
From a Windows workstation's CD-ROM drive. To access the online documentation directly form a Windows 3.1 or Windows 95 workstation equipped with a CD-ROM drive, do one of the following:
For Windows 3.1. Insert the documentation CD-ROM into the workstation's CD-ROM drive. From File Manager, choose File, and then Run. Type the following path: D:RUN_EXE. When you select OK, Netscape 3.0 and the documentation will auto-launch.
For Windows 95. Insert the documentation CD-ROM into the workstation's CD-ROM drive. Wait while Netscape 3.0 and the documentation auto-launch.
From the server or with browsers other than Netscape. If you have installed the documentation to the server, are accessing the documentation CD-ROM as a mounted NetWare volume, or are using a version of Netscape or a browser not shipped with IntranetWare for Small Business, refer to Table 5-1 to determine how to access online documentation.
Navigate Online Documentation
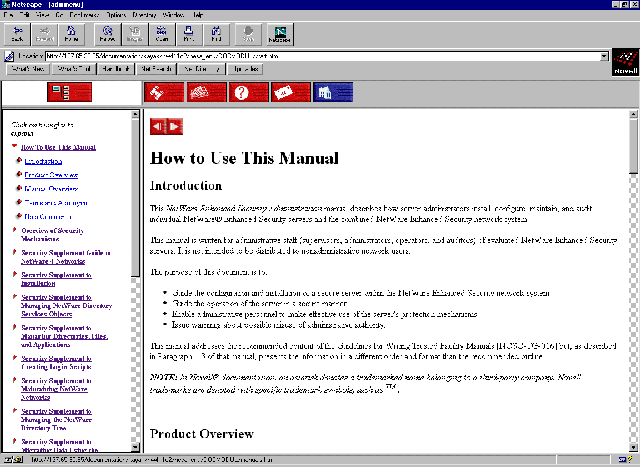
IntranetWare for Small Business online documentation displays four separate frames (see the next figure). The top two frames contain buttons with various functions that you use to navigate. The bottom two frames contain the table of contents and the documentation. These frames change as you navigate while the frames containing the buttons remain the same.

There are two Toolbar frames that contain buttons that change the appearance of the Table of Contents and the Contents frame. The button in the Toolbar frame on the left effects the appearance of the Table of Contents frame; the buttons in the Toolbar frame on the right effects the appearance of the Contents frame. The following table presents a detailed description of the functionality of the buttons in these Toolbar frames.
Button icon Description Show/Hide 
Hides or displays the table of contents. Search 
Displays a search form that allows you to search for keywords and phrases.
Search strings are displayed in the bottom left frame. Click the string to access the related section.
Contains information on search syntax and other tips to ensure a successful search are provided.Manuals 
Displays a list of all books in the current online documentation set.
For example, if the NetWare Connect collection is selected, clicking this button displays all books in NetWare Connect set.Help 
Displays the Help page.
Help explains how to navigate and print Novell Online Documentation.
Displays a page that allows you to return timely feedback to the IntranetWare for Small Business development and documentation teams. Home 
Displays the Novell Online Documentation home page. From the home page, you can access any online documentation collection included in this release: Small Business, NetWare 4.11, and NetWare Connect. The Table of Contents Frame includes both graphic buttons and text that you can click. The following table presents a detailed description of the functionality of the buttons and details the results of clicking the text and buttons.
Click On Result Colored text (links) The page of documentation associated with this text is displayed in the content frame. 
The sections within the selected chapter are displayed as subheadings. 
Hides the sections within the selected chapter. The Contents Frame contains the documentation. The content of this frame changes as you click the various links in other frames. This frame also contains text and graphic buttons that you can click. The following table presents a detailed description of the functionality of the buttons and details the results of clicking the text and buttons.
Click On Result Colored text (links) The page of documentation associated with this text is displayed. 
The previous section or chapter is displayed. 
The next section or chapter is displayed. Printing
The Print command is a system function and is, therefore, handled differently by each operating system. When you initiate the print process from within your browser, a message is sent to the system to print the desired document. Once the print dialog box appears, you will recognize the options available to you based on your operating system.
Because frame represents a separate file, it is necessary to provide a way to specify which file is to be printed. The following steps outline the printing process:
Procedure
Navigate to the chapter or section you want to print.
To print a chapter, click the chapter title in the Table of Contents frame.
To print a section, click the section title in the Table of Contents frame.
If the chapter title in the Table of Contents frame is not expanded to show the section sub-headings, click the triangle graphic associated with the chapter and the sections are displayed.
Click within the Contents frame.
Make certain that you don't click on a linked text string or a graphic.
Choose the Print command in one of the following ways:
Click the Print button on your browser's Toolbar.

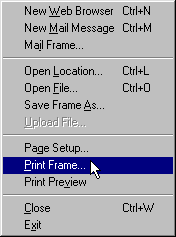
From the File pull-down menu, select Print Frame.

Use the Print keyboard shortcut (dependent on browser and operating system).
Choose the preferred options, such as number of copies to print and printer properties, in the system Print dialog box.
Click OK.
![[Prior]](prev.gif)
Prior ![[Index]](index.gif)
Index ![[Next]](next.gif)
Next ![[TOP of Page]](top.gif) This page is maintained by:
Michael P. Harris
This page is maintained by:
Michael P. Harris![[Viking Home Page]](viking.gif)
viking.delmar.edu
Last Updated: Sep 20![[E-mail]](@email.gif)
mpharris@surf.delmar.edu
Copyright © 1998